How to VMAF (with ffmpeg), journey to the center of despair
How to get VMAF up and running (with ffmpeg), on windows. You know you want to!

NOTE: With the release of VMAF 2.0, the pkl models have now been swapped for the json models.
VMAF is an incredibly useful tool to do video analysis and comparisons. Unfortunately, it's not entirely straightforward, especially on windows. The despair mostly comes later though, once you have it up and running.
For this we will need a couple of different things.
- FFMPEG compiled with VMAF support.
If you're on windows like me, and dont feel like compiling, you can grab this link (needs 7zip), courtesy of "Gyan":
https://www.gyan.dev/ffmpeg/builds/ffmpeg-release-essentials.7z
2. VMAF models.
Depending on the scenario you want to test you can choose different models. I will using and referring to the default model vmaf_v0.6.1.json. You can download the model here:
https://github.com/Netflix/vmaf/archive/master.zip
The models are located in the "models" folder, make sure you grab all of them, to be sure.
Models explained: https://github.com/Netflix/vmaf/blob/master/resource/doc/models.md
I prefer placing the models in a short path, for instance in a subfolder of where ffmpeg is located, as this might make it a bit easier to to reference (which we will need to do). You'll thank me for this later.
Now, you might be wondering, why would we bother with this when we could just use the tool that Netflix released (vmafossexec.exe or vmaf.exe)?
The reason is that VMAF only works with YUV format, and if you're planning to test a bunch of different videos, then its pretty likely that you will need to use ffmpeg to convert stuff regardless. Might as well cut it down, and have ffmpeg do everything for us. There is also other cute bonus stuff we can do this way, we'll get to those parts later.
We'll start with the most basic from of analyzing a video file. But first, we need to be familiar with a couple of different concepts.
- Reference (Raw/original copy). This is the file we will be comparing against, and will serve as our "flawless"/perfect video. It dosent have to be perfect, but this is what the model will be comparing against.
- Distorted. This is the video file that we've compressed/modified, and we're looking to score this file against the reference file (1).
- VMAF score. The VMAF score will be using the model we've chosen to provides us a score, so what it's actually telling us will change a bit depending on the model. For our model, its predicting quality of the video on a 1080p display in a "living room environment", and presuming that the persons viewing distance is 3x the height of the screen (25cm monitor/TV height = 75cm viewing distance).
We consider a score of 20 to be very bad, and a score of 100 to be excellent (flawless). I would consider anything above 80 to be quite good, and above 90 to very close perfect/indistinguishable from the ref.
The way I usually use VMAF is to test the impacts of different parameters, resolutions, frame rates etc under certain bitrate constraints for instance. This is just one of the many use cases for VMAF.
Before we start, if you have not already done so, I would heavily encourage adding ffmpeg.exe to your PATH (search for "Edit the system" > Advanced > Env var > Path > add path to ffmpeg.exe). This will make it a lot more convenient when we need to call ffmpeg, we dont need to type the full path, and workign in the directory where our video files are will make the process shorter and easier to keep track of.
ffmpeg -i distorted.mp4 -i reference.mp4 -lavfi libvmaf=model_path="C\\:/ffmpeg/model/vmaf_v0.6.1.json" -f null -Now, you may be looking at the model_path and start thinking "what the hell kind of path is that". I hear ya, and it certainly took me a bit of time to figuring how and why it had to be like that. This is how I ended up having to point at the model, and if you're on windows like me, there is a decent chance you might need to do the same. Feel free to try typing out the regular path, but if you get a "cant find model" message, you know why ;)
The path is literally just C:\ffmpeg\model\vmaf.., and the why is slightly complicated. You dont have to care about this, but if you're curious, you might want to read here: https://github.com/Netflix/vmaf/issues/424
If you would like some extra output from vmaf to dig into, and even an optional report from ffmpeg, you can have that as well:
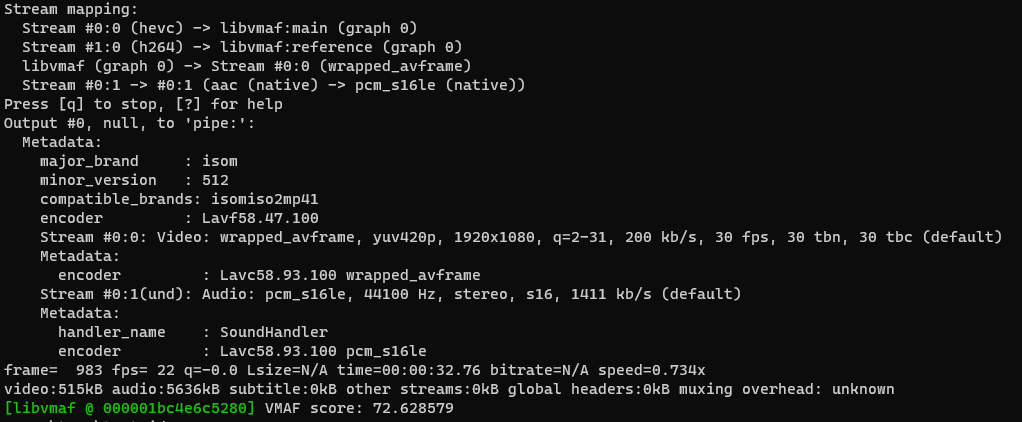
ffmpeg -i dist.mp4 -i ref.mp4 -lavfi libvmaf=model_path="C\\:/ffmpeg/model/vmaf_v0.6.1.json":log_path=vmafOutput.txt -report -f null -Both should provide you with an aggregate score of the run, in the form of VMAF score: 72.54... Feel free to use the log option if you would like more in depth information.
Sooo sloooow...?
With the release of VMAF 2.0, the changed the way threading works for VMAF. In the past it would auto pick a value based on your CPU (not sure how). With the new one it just defaults to 1. This leaves quite a lot of speed on the table, and I believe the accuracy is pretty negligible by increasing this.
-lavfi libvmaf=model_path="C\:/ffmpeg/model/vmaf_v0.6.1.json":n_threads=x
You need to pick the "x" value your self. For me, on a 6 core 12 thread (HT enabled) i7-8700 gave me the following results. You might need to just try it out.
x=1:	62sec, score 87.778462
x=2:	33sec, score 87.778462
x=3:	22sec, score 87.778462
x=6:	16sec, score 87.778462
x=10:	13.8sec, score 87.778462
x=12:	13.8sec, score 87.778462
x=16: 14.1sec, score 87.778462Alright, so lets say you have it all set up, and you're ready to analyze the first file you've encoded, and you're met with this:

Whelp, seems like your encode/file is not the same resolution as the reference. What do we do now? Are we out of luck? Do we need to run another encode to make the file the same resolution?
Of course not, ffmpeg to the rescue as usual. We just need to add some extra parameters/filters to have ffmpeg scale it up on the fly.
ffmpeg -i dist.mp4 -i ref.mp4 -filter_complex "[0:v]scale=1920:1080:flags=bicubic[main];[main][1:v]libvmaf=model_path=C\\:/ffmpeg/model/vmaf_v0.6.1.json:log_path=VMAF_out.txt" -f null -This is basically just saying, take the first video (dist.mp4) and scale it to 1920x1080 (change this to fit your ref) using the bicubic filter. Rest is unchanged. Very neat, praise be ffmpeg.
VMAF 2.0
Another neat little addition is the option to get some means, like harmonic mean. You also now get pooled metrics, like min, max, mean and harmonic mean (if asked for) thru pool=harmonic_mean.
I think that should cover the basics. Now get out there and VMAF some stuff, and let the despair of the never ending time sink begin!
Thank you for you time, and have an amazing day ;)